I had a lot of hard drives spinning in my basement, which is not an issue in and of itself, but I had the option to (mostly) maintain or increase capaciy with fewer drives, so I took it.
The situation
I have upgraded my storage a few times, but I've never purchased hard drives with the sole intent of installing them in a NAS. They've been retired drives from work, leftovers from other projects, etc. The capacity has been sufficient, but the strategy hasn't always been ideal.
I began this project with a few objectives:
- Reduce the number of hard drives I'm paying to run 24/7. Do I really need eight hard drives to yield 24TB of storage?
- Free up drive bays in my servers. This migration was more compicated due to not having free bays; I'd like to avoid this in the future.
- Maintain or expand the size of existing pools.
Current capacity
I was using a lot of hard drives to achieve my existing storage capacity (excluding various smaller SSD pools that are left untouched):
- 8 x 4 TB RAIDZ2 (~24 TB) for my backup pool
- 5 x 8 TB RAIDZ2 (~24 TB) for my main "big" storage pool
- 3 x 1 TB RAIDZ (~2 TB) for my DVR storage
I'd basically filled the 10-bay chassis of my main NAS and 8-bays of my backup server to capacity. I was paying to run an unnecessary number of drives, given currently available capacities, and I didn't have a straightforward upgrade path.
New storage layout
I took the plunge and purchased five 16 TB, manufacturer-refurbished enterprise and NAS drives. All drives were manufactured by Seagate, some were from the Iron Wolf Pro line, others from the Exos line (and yes, I did check the spec sheet on the Exos drives to make sure they would fit my needs).
My plan was as follows:
| Pool | Current layout | Current capacity | New layout | New capacity |
|---|---|---|---|---|
| Backup | 8 x 4 TB RAIDZ2 | 24 TB | 3 x 16 TB RAIDZ | 32 TB |
| big | 5 x 8 TB RAIDZ2 | 24 TB | 2 x 16 TB mirror | 16 TB |
| dvr | 3 x 1 TB RAIDZ | 2 TB | 2 x 4 TB mirror | 4 TB |
This plan substantially reduced the size of my big pool, but I was okay with that; it's still plenty of capacity for my current needs and is easily expanded by adding an additional mirror, either within the same pool or as a separate pool. I'm also giving up some redundancy on my backup, a tradeoff I was also okay with - it's a backup and one of at least two, at that.
With a new storage plan in place (and a long-winded intro complete), I needed to begin the process of migrating my data.
TrueNAS data migration
This is the process for replacing the underlying hard drives for a ZFS pool in TrueNAS (Core).
My replication plan
My situation was such that I had insufficient drive bays available to perform a local replication, i.e. I had to replicate the pools across the network. I have both servers on the same VLAN, connected by a 10G link, so the network speed would not be my bottleneck; the same may not be true if you only have a 1G network.
My plan was to:
- Export my backup pool from the backup server, shutdown the server, and remove the eight hard drives.
- Place the two new 16 TB drives in the backup server and create a new pool (
new_big, or something like that). - Using ZFS replication, copy the data from the existing pool to the new pool.
- Export and remove
new_bigfrom the backup server; export and removebigfrom the main NAS. - Install and import the
new_bigpool into the main NAS. - Install the new backup drives in the main NAS, repeat the process in the opposite direction.
- Swap the backup drives.
Honestly, I did this long enough ago that I don't remember if I actually replicated the existing backup pool or decided to just start from scratch. You could do either.
Backup your data
This should go without saying, but I'll say it: backup your data before you start this process. For me, this meant simply relying on existing automated snapshots, but verifying that replication to the backup server had been successful.
Export the existing pool
If you're in the same situation as me, where you need to free up drive bays, you'll first need to export the pool from TrueNAS. If you have sufficient drive bays in the local or a second server, you can skip this step.
To export a pool from TrueNAS:
- Navigate to the TrueNAS UI
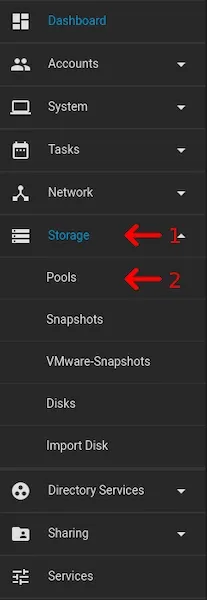
- On the left navigation menu, choose Storage, then Pools
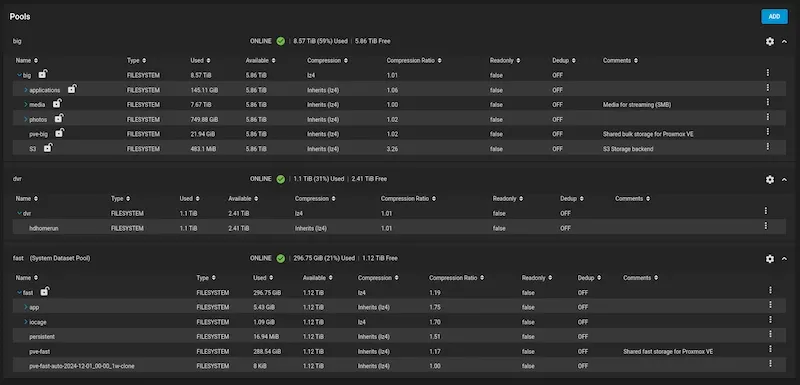
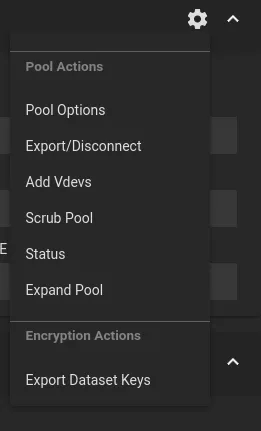
You should now see a list of all your storage pools. For the one you will be exporting, click the gear icon in the top right corner to bring up the Pool Actions menu.
On the Pool Actions menu, choose Export/Disconnect
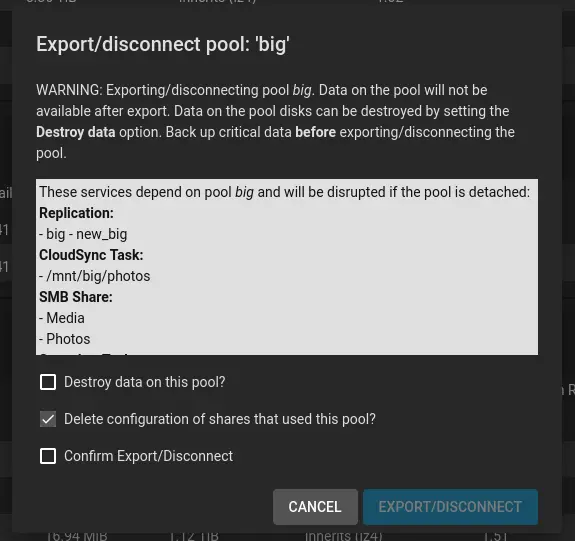
Choose the appropriate options before disconnecting. For me, this meant:
- Uncheck Destroy data on this pool
- Uncheck Delete configuration of shares that use this pool
Check the box to Confirm Export/Disconnect and click Export/Disconnect.
In a few moments your pool will have been exported and you can remove the drives from the system, freeing up the necessary space.
Create a new pool with the new disks
With your new hard drives installed in the machine, the first step is to create a new pool with your new/target disks. This pool does not need to (and perhaps, ideally, does not) have its final name, as it will eventually be renamed. The pool is created within the TrueNAS UI via the standard process.
Snapshot your data
With the new pool setup, in this example we'll call it new-pool, we need to copy over the data from the pool we'll be replacing, tank (because everyone seems to like calling their zfs pools tank). We'll also assume that the dataset we want to copy on that pool is named pictures.
We'll first create a snapshot of our existing pool. This snapshot represents the data that will actually be replicated, so don't change your data once you've created the snapshot. The command to create a snapshot is:
zfs snapshot -r pool_name@snapshot_name
For our example pool:
zfs snapshot -r tank@to-copy
The -r argument will create a recursive snapshot, meaning it will copy all datasets and sub-datasets within our pool.
Creating the snapshot is basically instantaneous.
Replicate your data
We'll next copy the data to the new pool. The amount of time this takes will depend on how much data you have to move. The most recent operation of this sort that I did (the dvr pool), moving about 2 TB from a RAIDZ1 to a ZFS Mirror, copied the data at around 200 MB/second (somewhere around 100 minutes to copy the snapshot). This was a local-to-local replication, limited only by the disks' read/write speeds.
If you are copying to a pool on the same machine:
zfs send -Rvw tank/pictures@to-copy | zfs recv -F new-pool/pictures
If you are copying the datasets to a remote machine:
# Replace 192.168.1.100 with the IP of the destination machine
zfs send -Rvw tank/pictures@to-copy | ssh root@192.168.1.100 "zfs recv -F new-pool/pictures"
With this command we are copying the pictures dataset from the tank pool to the pictures dataset on the new-pool pool. You cannot copy the snapshot to a pool that already has a dataset of the same name.
The options specified on the send command are:
-R, --replicate: create a replication stream; this will preserve all properties, snapshots, descendant file systems, and clones.-w, --raw: send the dataset exactly as it exists on disk; allows you to send an encrypted dataset without loading the encryption keys.-v, --verbose: prints an update each second, reporting how much data has been sent.
See the OpenZFS docs for more options.
On the receiving side we specify the -F option, forcing a rollback of the file system to the most recent snapshot before performing the receive operation.
Because this transfer can take a significant amount of time, you will want to connect to the server in such a way that your connection does not time out or get dropped, doing so will end the transfer and you'll have to start it from the beginning (or perhaps there's a way to resume it, but I don't know how).
Lastly, if you're replicating between machines, the receiving machine needs the public key of the SSH keypair from the sending machine in its authorized_keys file. Because I was replicating to the backup machine, this was already setup.
Replace the existing pool
The final step in the process is to actually swap the new pool for the old one.
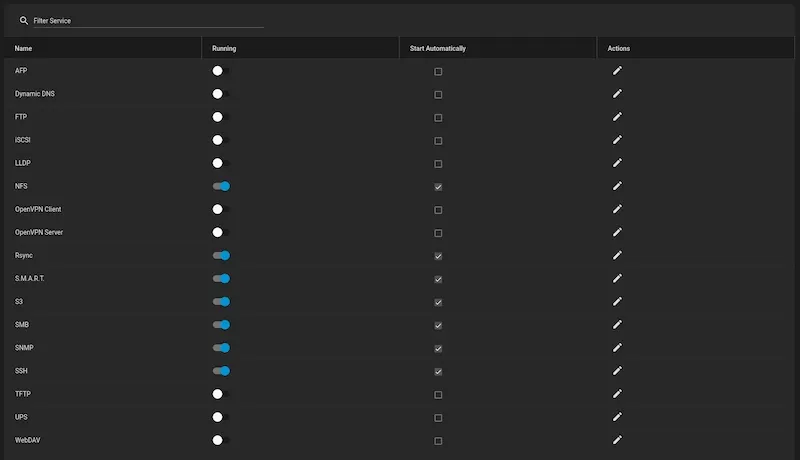
First, on the machine that hosts the pool we want to replace, we'll disable any services that may be interacting with any of the datasets in our existing pool (tank). Services like nfs, smb, etc. that could be accessing shares.
On the left navigation menu, choose Services, bringing up a list of all available services on the instance. Any service that is running will have the Running toggle to the right and be blue in color.
Next, we must export the existing pool (tank) within the UI. Use the same procedure outlined above. Again, we will be prompted to choose some options:
- Destroy data on this pool?
- Delete configuration of shares that use this pool?
- Confirm Export/Disconnect?
Make sure that Destroy data on this pool and Delete configuration of shares that use this pool are unchecked.
You may have full faith that your new data set will work without issue, but I don't, so I keep the old pool around. You also want to preserve the services that are configured to use the datasets so that when we get the new pool in place, we'll be able to resume them without reconfiguration.
We'll then export new-pool using the same procedure. Again, we don't want to delete the data, but removing services shouldn't matter as we shouldn't have any setup for this pool.
With both pools exported (but the drives not removed), we'll begin the renaming process.
Renaming pools
I made the mistake of ending up with two pools having the same name. To avoid this, we'll first rename the old pool so that we can easily differentiate between the new and old pools when it comes time to reimport them. Of course, if you're removing the drives from the old pool, this is a non-issue.
# renames "tank" to "tank-old"
zpool import tank tank-old
zpool export tank-old
Rename the new pool to have the same name as the pool it's replacing.
zpool import new-pool tank
zpool export tank
With the new pool now having the name of the one it's replacing we can import it via the UI.
Import the new pool
Go back to the Pools overview (where we previously exported the pools).
In the top-right corner, you'll see a blue button that says Add. Click the button to start the pool import wizard.
Choose Import existing pool, then click Next

If you have an older pool that uses GELI Encryption, set the option to Yes, decrypt the disks, otherwise leave as No, continue with import and click Next.

Choose the pool to be imported (this is where having different names for the two pools, if the disks from both are still installed) and click Next.

I don't have a pool to reimport, so I don't have a screenshot beyond choosing the pool, but you'll confirm your options at the next step and TrueNAS will import the pool.
Re-enable any services that you disabled during the process and make sure that you can access the data in the data set.
Once you're satisfied everything is working as it should, you can do with the old disks as you please. I eventually repurposed two drives from my backup pool as dvr disks, but I let things run for a little while before destroying the existing data, just to be on the safe side.